Old to Young Case Study in Photoshop by Cassio Braga
Sunday, June 16, 2013
0
komentar

Reading the comments about the Photoshop Battle and I noticed the a lot of people were interested in knowing and seeing the images that were created during the event. Because of that I decided to recreate one of the images I did in my first battle, which was my favorite. This time however I had more time to pay attention to some details, in the event we had only 30 minutes to come up with an idea and make it come true.
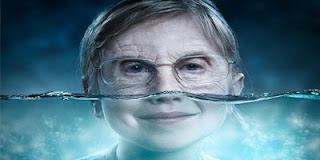
So as I mentioned before this image, I will present in this case study, was created in my first duel and the subject was water. I really like the result because besides the visual strength it has a simple idea that makes us wonder and think about life and aging.Step 1
The first image I selected was a photo of a little girl that we have taken last year in the end of a photo session back in the studio where I work, StudioMe. I chose this image because I really like the expression on her face, she is only 7 years old but was very comfortable in front of the camera.Right after this I placed the girl’s photo in my composition I selected a photo of an old lady that was taken again in another photo session at StudioMe.

Step 2
Incredibly the two images matched pretty well one I put one over the other, so all I have to do was to create a good transition between the two faces right below the nose line. This transition was done simply by putting the image of the girl in a layer beneath the old lady layer in which I added a layer mask and hid the layer. Then with a very soft brush I started to make some areas visible, but very smoothly and natural.In order to make the transition very realistic I made some adjustments using the Liquify filter to move the nose a little bit down on the face of the girl.
After that I did a color adjustment to make the hue of the skin of both photos match. To do that I used some Adjustment Layers such as Curves and Vibrance.

Step 3
The next step I started to create the mood for the composition, sort of like how I would like to perceive the idea behind the composition. To do that I created a selection to separate the top from the bottom part. For the top part I created this sort of vignette effect to driver the user attention to the face, like the focal point. For the bottom part, I just did some color adjustments to make sure that the girl really looked as if she was underwater.
To make the scene more realistic, specially the underwater part, it was necessary to add some light effects. So in this part of the process I looked for an image to create the caustics effect.
In optics, a caustic or caustic network is the envelope of light rays reflected or refracted by a curved surface or object, or the projection of that envelope of rays on another surface. The caustic is a curve or surface to which each of the light rays is tangent, defining a boundary of an envelope of rays as a curve of concentrated light. Therefore in the image to the right, the caustics can be the patches of light or their bright edges. These shapes often have cusp singularities.
To add some depth I applied a blur to the caustic effect and I also added some blurry air bubbles. Still I thought the image needed even more depth. So I added a layer and applied a render clouds and after that used the Gaussian Blur to make it super blurry, enough to give the idea that the background wasn’t empty.
Now for the underwater part I created a sort of inverted the illumination. To do that I used a Curves Adjustment Layer in which I pulled all the channels up increasing the brightness of the image. I also Inverted the mask to hide this adjustment and then with a very soft brush I started make the layer visible, that way the transition would be much more smooth.

Step 5
The bubbles in the water made the difference in terms of realism. This part took me more time because I had to do some testing. To make the effect as realistic as possible the bubbles needed to reflect the rest of the image, but a little bit darker. However I didn’t like the result of none of the images I was testing, only after quite a lot of time I found the image I was looking for, with some subtle air bubbles. Even though the image might not be the most coherent in terms of photography and with the composition, in my humble opinion they were the ones that created the best effect. Those little bubbles really give this ideas that they are making the aging process turning the old lady into a child.Technically speaking, the bubble layers were a layer with a very light background with the bubbles, so I simply inverted it and change the Blend Mode to Screen. In case you don’t know, the Scree mode hides all black pixels of the layer.
Still in this step I selected the lenses of the glasses of the old lady layer and then applied a blueish gradient as if it was reflecting the water. The gradient layer was created on top of the old lady layer and then I applied the Soft Light Blend Mode.
Step 6
Here the process was almost done, just some fine tunes and little tweaks. I added some bright spots on the water surface, change the color of the old lady eyes to a more blueish tone and applied a Smart Sharpen only in the top part, that way the two parts would match a little better. The last thing I did here was to apply a Photo Filter Adjustment Layer with blue with 10% of Transparency on top all the other layers. That way all layers would sort of get better blended together.
Step 7
The whole process to create this image took me like 10 hours, however a good amount of this time was just testing different images trying to find the best ones.I hope you like this case study and that it may help you.
Baca Selengkapnya ....


